I've always loved miniature food, and have gotten even more interested in this type of thing since Lena moved into the Rainbow High House and started her own series of reviews: Tea With Lena. After all, if Lena is going to be inviting guests over to her place for a chat and a snack, she's going to need a well-stocked kitchen, right?
Way back in the first Tea With Lena post, Ryleigh left a comment that mentioned MGA's Miniverse food. The Miniverse toys are primarily little surprise ball kits that include everything you need to make a tiny fake food dish. I was immediately excited about Ryleigh's suggestion, but of course it took me almost nine months to act on it.
I'm happy that I was so slow in pulling this review together, though, because MGA has released several new Miniverse products during the last few months. The most interesting thing to me is the Make It Mini Kitchen. I love kitchen-themed toys, and I suspect this particular one will be popular during the holidays. So, today I'll explore several of the Miniverse options that are currently available, including the kitchen set, and I'll keep my eye on how useful each item might be to Lena and her 1:6 friends.
 |
Lena with a Miniverse Make It pizza.
|
For anyone not familiar with the Miniverse lineup, I'll run through the products that I'm aware of. To start things off, here's the view at my local Target, showing the Make It Mini Kitchen and several boxes of surprise balls on that middle shelf:
These toys are on display with other surprise ball toys like L.O.L. and the various ZURU Mini Brands. In fact, at my store, several of ZURU's Mini Brand food toys were jumbled in with the Miniverse balls and vice versa.
In the Miniverse surprise ball category, there are two waves of a Diner Series. These sets cost $10 and come with make-it-yourself food and a small white plastic table for display:
There are also two waves of a Café Series. These balls are smaller, cost $7, and have simpler food items with no table:
There's a Lifestyle Series ($10) that includes things like plants, candles, and goldfish bowls (which I covet):
And there's a new Halloween Series ($10) with what looks like a lot of orange and black food and a spider web table:
In addition to the surprise balls, there are some larger Miniverse sets, like the kitchen that I'll review today, which costs $40:
Apparently Target agrees with me that this will be a popular holiday toy, because the entire top shelf of one aisle is lined with Make It Mini Kitchens:
 |
| To infinity and beyond! |
There's also a multi-pack food set ($30) that I'll look at today:
And there are some other large items that I did not buy, like this $20 pizza kit:
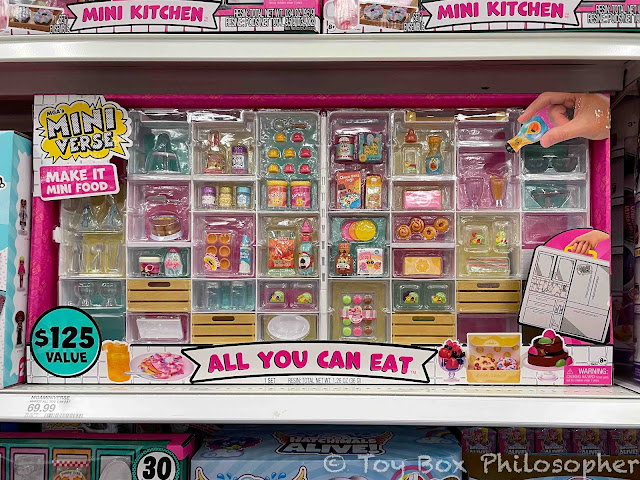
And this massive All You Can Eat box that costs a whopping $70:
I saw the All You Can Eat set in person at Target:
 |
| The cruise ship of Miniverse toys. |
It looks impressive at first glance, but up close there's a lot of empty space. I worry that for $70, the contents might feel underwhelming once they're out of the box.
Here's a better look:
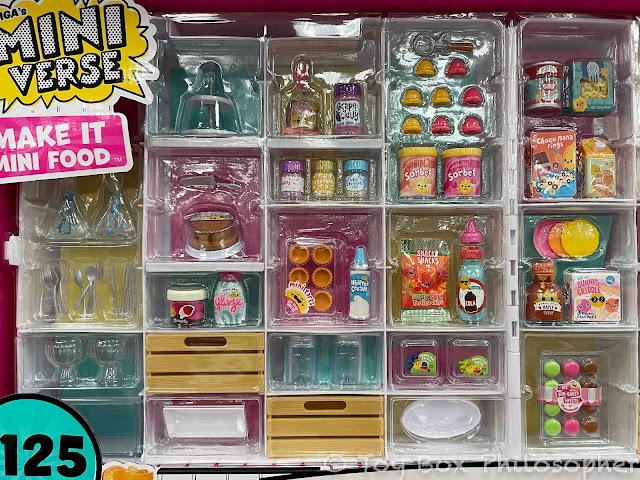 |
| Are those macarons in the lower right corner? I love those. |
But overall, I don't see enough novel items for this set to tempt me.
 |
| The carrying case might be useful for storing all of the little pieces, though. |
Anyway, I wasn't sure how to wrap my head around the concept behind these toys. The basic idea is that you mix small plastic pieces into resin, and then cure the resin to get a durable food-themed miniature.
Resin fumes smell bad, though, and can cause irritation to the respiratory system. Touching uncured resin can also result in skin irritation. In short, resin is not a great substance to include in a kid's toy.
The recommended age range for the Miniverse toys is 8 and up, which makes sense. I would be hesitant to let a younger child play with these kits, and all kids should probably have some level of supervision.
Since I had no idea what to expect with a resin-based toy, I actually tested one of the Miniverse surprise balls in a short
Patreon review, and asked for some feedback about the level of interest. There was quite a lot of interest, so here we are!
I'll give a quick summary of the Patreon content so that everyone is on the same page. For that review, I chose once of the Diner Series 1 surprise balls:

All of the ball's contents came wrapped inside individual plastic bags, so it took a while to get everything out, but here's what I found:
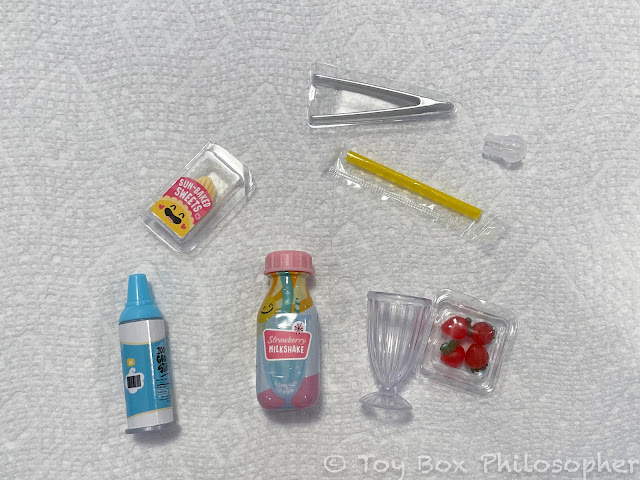 |
| Whipped cream, cookies, a milkshake bottle, a glass, strawberries, a straw, and tweezers. |
The packaging of the food ingredients is really cute. I love how the strawberries and cookies come in little cartons, and how the puffs of whipped cream are stored inside a realistic whipped cream can.
Even before I tried to make anything, I was impressed with the detail in these ingredients. I wanted to stock Lena's kitchen right away! But my primary goal here was to learn about the basics of assembling a Miniverse kit.
Each set includes a bottle of resin disguised to look like a kitchen item. In this case, the resin was inside the milkshake bottle. The resin is a viscous liquid inside the bottle, but hardens when exposed to ultraviolet light (in sunshine, for example).
For all of the kits, resin gets mixed with the plastic ingredients according to a little recipe that's on the back of the collector's sheet. Here's the recipe for my strawberry milkshake:
Following the recipe, I filled the glass part way with the resin liquid:
And then I mixed in a few strawberries and left the straw:
Next, I put the glass outside so that the resin could cure. I foolishly chose to do this project on a cloudy, rainy day, but there was enough ultraviolet light for the resin to cure--at least most of the way. Parts of my item remained a bit sticky and I had to cure everything more when the sun came out a few days later.
After the first layer of resin had hardened, I brought the glass back inside, added a bit more resin, and then arranged the garnishes at the top. Then I put the shake outside to cure again.
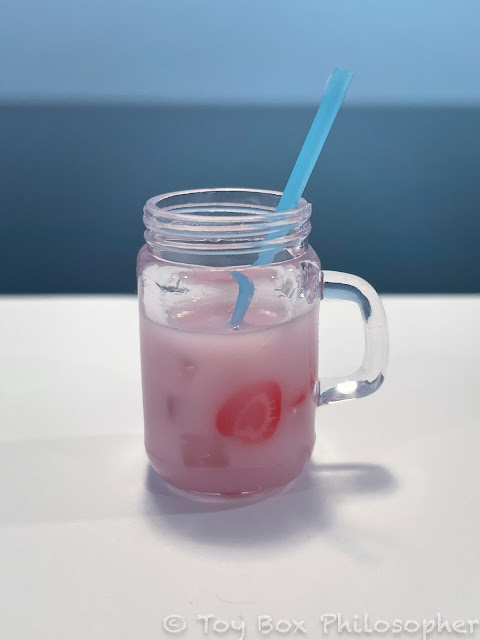
Here is the final result:
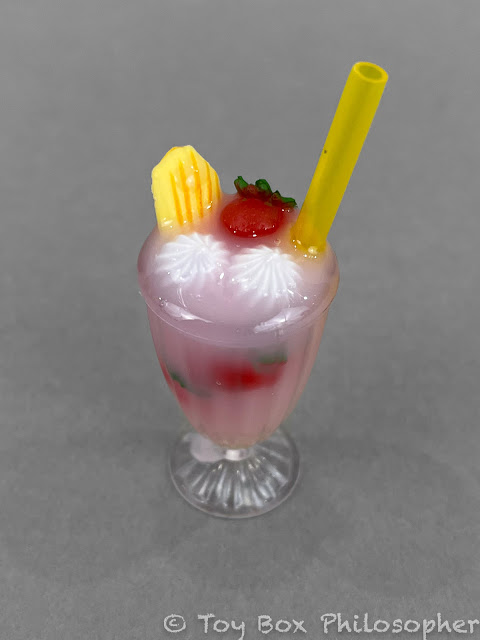 |
| The whipped cream sank a bit too much. |
I had fun with this test kit. I think the resulting milkshake is pretty good, and has a lot of detail. I wish that the resin was more opaque, to make it look more like an actual, creamy milkshake, but it's a good effect overall--especially from a distance. And I still have some leftover ingredients that I can use in Lena's kitchen.
I searched the web briefly for comparable 1:6 ice cream miniatures and found a few interesting comparisons. For around $12 you can get 30 of these:
 |
| Do I want 30 of those? |
Or for $13 you can get all five of these:
 |
| Yes, please! |
The Miniverse milkshake is somewhere in the middle: it's certainly a better miniature than the first example, but I think I'd rather have the five fancy shakes in the second photo.
So, I was pretty happy with the resulting miniature shake, but there were two things about my experience that were problematic. First of all, the resin is hard to work with. It's sticky, and doesn't wash off with soap and water. I was only able to remove it with rubbing alcohol. Also, the resin smells bad. Like, really bad. It was a hard odor to get rid of, too. Even after I washed my hands with alcohol several times, I could smell the resin on my fingers. I was tempted to try a kit using Mod Podge instead of resin, but the drying time for that glue is really long and I can be impatient.
Another problem is that the milkshake is not in scale with Lena:
 |
| I can't drink all of that. |
I mean, I guess I've had ice cream sundaes that big at certain points in my life, but the strawberries and the straw are not exactly 1:6 scale.
Here's a comparison between the Miniverse milkshake and some of Lena's other drinks:
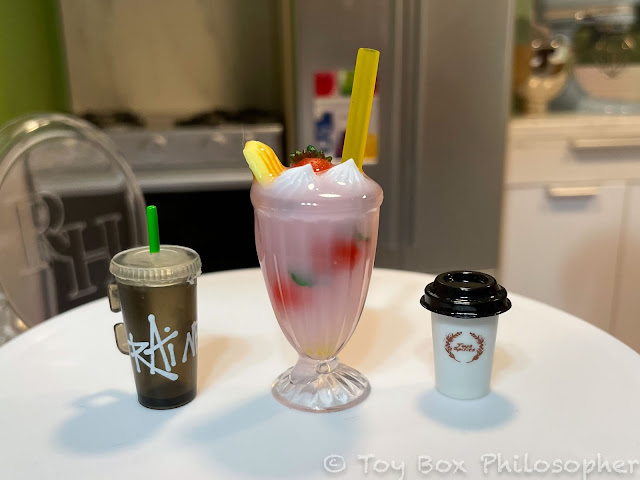 |
| From left: Rainbow High drink, Miniverse milkshake, and Gatcha Takeout Café cup. |
The Patreon review left me intrigued, since the project was fun and reasonably rewarding, but it also left me a bit hesitant--and with some questions.
Mostly I wanted to know if any of the other Miniverse food items would be more realistic or more in scale with Lena. I was also curious to see what the assembly experience would be like on a sunny day, with lots of ultraviolet light bouncing around.
So, after getting some enthusiasm from my
Patrons, I went ahead and bought a few more Miniverse products, including the Make It Mini Kitchen set:
 |
| Miniverse Make It Mini Kitchen, $39.99. |
This set appealed to me not just because of the kitchen, but because most of the food is visible, so there were no worries about getting a repeat of the strawberry milkshake:
 |
| I'm very clearly getting a different strawberry drink and some donuts. |
There's a bit of a surprise, though, because something is hidden in one of the cupboards:
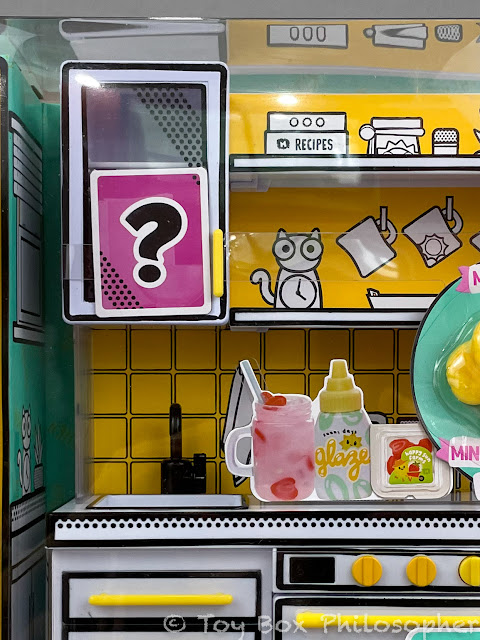 |
| Oooh! Fun. |
Another cool feature is that the kitchen's oven has a built-in ultraviolet light, so the resin can be cured indoors!
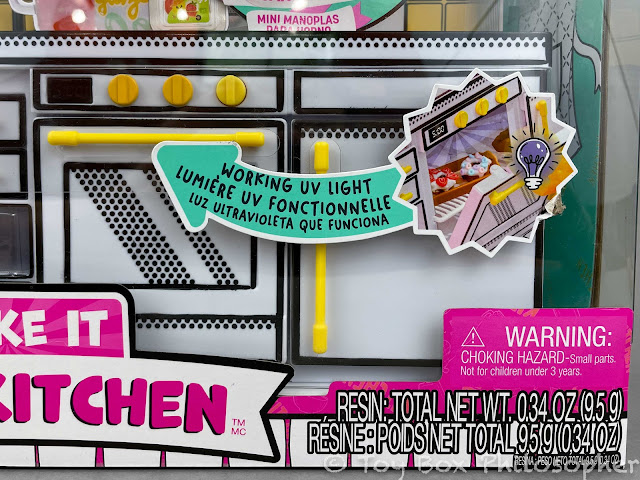 |
| No sunlight required. |
This is a brilliant idea, because if the Miniverse sets are, indeed, popular during the holidays, there are parts of the world where it might be too cold to effectively cure resin outside. An indoor curing oven solves that problem beautifully.
The back of the box has photos of the kitchen with some more information in three languages:
Apparently it's possible to customize the kitchen, which is neat:
Overall, I'd say that the packaging is very appealing. The bright colors are fun, and the graphics have a vintage comic book feel to them. It makes an impression:
 |
| Ka-pow! |
The kitchen came attached to a backdrop. When I pulled the backdrop out of the main box, a bunch of papers fell out:
Among the papers was a sheet with recipes for the two food items: coco-berry milk and berry cereal donuts:
There were also three large instruction sheets (with the same information in English, Spanish, and French):
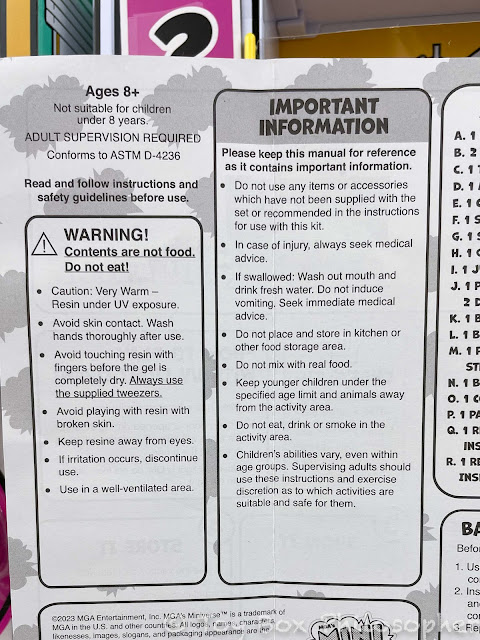
Not surprisingly, a large section of the instruction sheet is covered with warnings about the resin. This includes statements like, "avoid skin contact, use in a well-ventilated area, do not place and store in kitchen or other food storage area, and do not eat or smoke in the activity area."
 |
| Please don't blow up your house. |
There are a lot of parents who would read warnings like that and decide not to let their kid play with the toy. And I can't say that I would blame them.
There are definitely safe ways to work with resin (wear gloves, open a window, protect all surfaces, wear a mask), but not everybody will take the time or have the materials to do those things--or even read those warnings.
The kitchen was attached to the backdrop with a few plastic strips and four paper ties:
The paper ties were easy to cut, and a nice change in pace for MGA packaging.
Here's everything that was in the box:
I'll look at the food ingredients first.
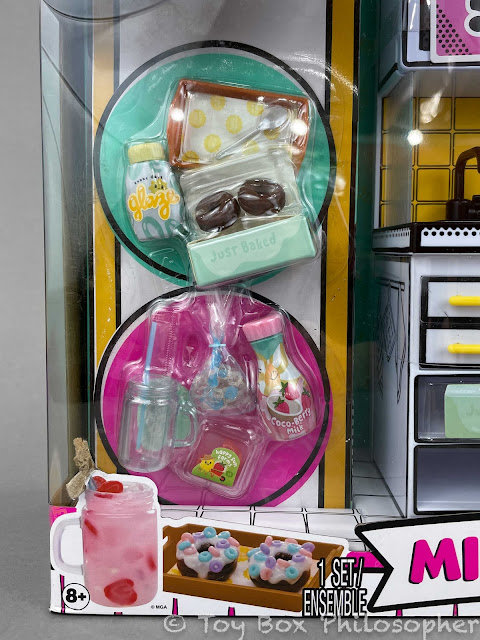
There are five components to the coco-berry milk:
There's a plastic mug, a straw, a bag of ice, a bottle of resin, and a carton of strawberries.
The strawberry carton is so cute!
It opens up to reveal a lot of sliced plastic berries:
 |
| *Static electricity sold separately. |
The sliced strawberries are not as realistic as the whole berries from the milkshake kit, but it's clear what they're supposed to be.
The bag of ice is also great. I love how it has a miniature plastic bag clip holding it closed:
The berry cereal donut kit is simpler, with a tray and spoon, two plastic donuts, a jar of resin glaze, and a donut box:
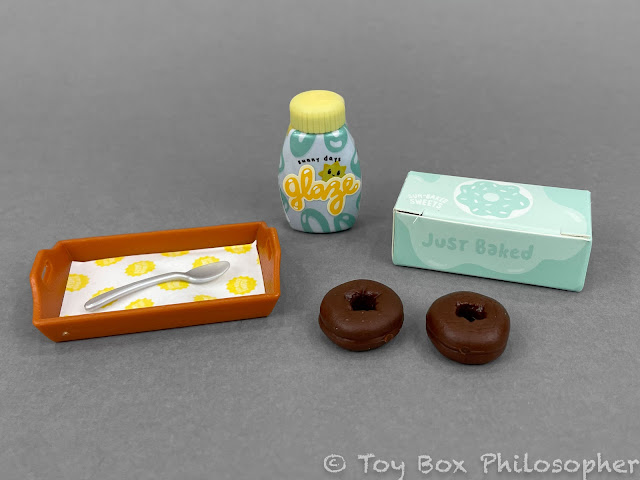 |
| Where's the berry cereal? |
The berry cereal must be what's hidden in the secret cupboard. So much for the element of surprise.
Now let's take a look at the kitchen.
The customizable part of the kitchen is the backsplash design. This is printed on a piece of cardboard that can be slid out on one side:
The opposite side of the cardboard is pink, and has different printed decorations:
There's also a piece of cardboard that slides in at the top of the kitchen. I thought I was missing this piece at first, but found it laying on the floor. Both pieces of cardboard slide out of place very easily:
Here's the pink side of the upper cardboard piece:
I like the designs on the yellow cardboard the best (that Kit-Cat clock!) and so I left everything yellow:
I'd recommend putting a little piece of tape over the slots that allow these two cardboard pieces to slide in and out--especially on the backsplash. Otherwise, it slides out every time the kitchen is moved.
The kitchen has some moving parts, like the handle on the faucet:
My pictures don't align well enough to make a GIF, but the faucet handle is in a different position in this next photo, if you can tell:
The kitchen also has a bunch of working drawers and doors on the bottom half:
There's a silverware drawer on the top left:
With a plain drawer underneath:
There's also a piece of plastic slid into the space underneath the drawers. This is to make the kitchen look more appealing in the box, but it could be flipped upside down and used as a third drawer:
Right in the middle of the kitchen is the ultraviolet oven. This is lined with mirrors and looks really cool when it's open! It's like there are unlimited oven racks:
 |
| To infinity and beyond! |
On the right side of the kitchen is a mini refrigerator with one clear shelf:
 |
| A bigger fridge would have been great for a food-based toy like this. |
Oh--and before I forget, the set also includes these yellow vinyl oven mitts, which I accidentally omitted from my box contents photo:
The upper part of the kitchen has moving parts, too. There are cupboards on both sides, and each has a single shelf that can be positioned in one of two different slots. The right cupboard has a plastic insert with a picture of a resin bottle:
And the left cupboard has the secret food items...i.e. the berry cereal:
Let's confirm what's inside:
Sure enough! There's berry cereal in the tissue paper. But there are a few other items as well:
There's a pink bowl, some tweezers, and a nozzle for the resin bottles:
The berry ring cereal was stored in a plastic bag within the cereal box:
 |
| That's so cute. |
The pink bowl made me think that I should be able to use resin milk to make a permanent bowl of cereal, but there was no resin milk hidden inside the cupboard.
I checked the list of box contents to see if I was missing something:
But there's no mention of milk anywhere. I guess I'm supposed to share one of the other resin bottles with the cereal?
Anyway, here's a closer look at the cereal box:
 |
| Those are some happy berries. |
It's a sturdy box with a lot of detail:
There's even a little tic-tac-toe game on the back!
And a teeny tiny nutrition label on one side:
The words are too small to read in real life (at least for me) but I can see them after zooming in with my camera:
I can't quite tell what it says there at the bottom, though. "Daily Value is based on how much its tiny quotient?" That doesn't make any sense.
In any case, the cereal box is very cute and fits perfectly into the cupboard:
The kitchen actually has a good amount of play value even without the resin activity, with all of those moving parts--plus the miniature ingredients, utensils, and containers:
Unfortunately, the kitchen is too small for Lena:
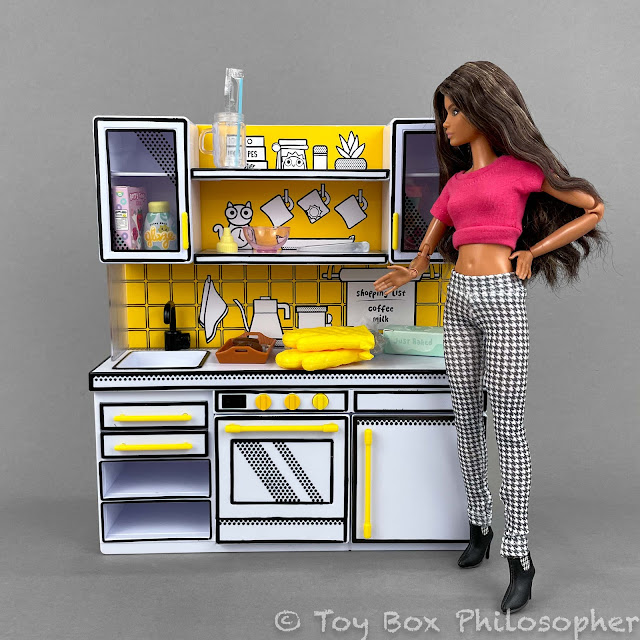 |
| I've seen milkshakes bigger than this. |
The accessories are a mixed bag, though. The oven mitts, for example, are huge. Like the size of a foam finger.
 |
| Go sports. |
But the little carton of strawberries looks about right to me:
As does the cereal box:
The jar glass is enormous, but the blue straw is a better size than the yellow straw in the strawberry milkshake:
The kitchen is a better overall size match for nine or ten inch dolls like my
FailFix Jenny:
The back of the kitchen is nowhere near as interesting as the front, but it has some molded designs:
And a fold-up counter that might be useful for storing food creations before (or after) they're cured:
The back of the kitchen also houses the battery compartment necessary for powering the ultraviolet oven:
Batteries are not included:
 |
| Sigh. |
I scrounged around my house for three AA batteries and then gathered everything I would need to make some resin food!
I got set up in my kitchen...despite the warnings against this approach. That's the only place where I have a big table with a nearby sink.
I examined the recipes for the donuts and coco-berry milk, which are both pretty straight forward:

|
| Notice that the back of the sheet has coco-berry milk and berry cereal donuts written in 5 new languages. |
I have to ask: what is coco-berry milk, exactly? Or what is the coco part of that? I see nothing chocolatey about this drink. It looks like strawberry milk with strawberries in it. Shrug.
In any case, I decided that I would do one of these recipes using sunshine to cure the resin, and one using the oven to cure the resin. Like a controlled experiment.
First up is the coco-berry milk:
I found that it helps to store the resin bottle upside down for a while, otherwise it can be hard to get enough of the liquid to drip out:
Once I had squeezed out as much sticky resin as I could manage, which was a bit of a struggle, I selected a few ice cubes and strawberries:
I stirred the plastic ingredients into the resin using the blue straw. This got smudges of resin all over the inside edges of the jar, so I used a Q-tip to wipe down the messy areas as best I could:
The plastic ingredients have a tendency to sink down into the resin over time, so it's a good idea to cure these miniatures as quickly as possible.
I cured the coco-berry milk outside in the sun, and it hardened very fast. It gets warm as it cures, too!
 |
| An exothermic chemical reaction! |
Even though the recipe didn't say to do this, I added a bit more resin and did a second cure so that I could have a strawberry garnish floating at the top:
 |
| I wish the strawberry was more realistic. |
Here's the completed drink:
I think it looks okay. I like the visible ice cubes. It's not as elaborate as my strawberry milkshake, and I don't get the coco part, but it's fine. Also, curing on a sunny day was really easy. The resin hardened in about a minute, and then I left the jar outside for another ten minutes, turning it onto its sides a few times so that all areas were exposed to direct sunlight.
Next I got the donut ingredients (and the kitchen oven!) ready:
This set comes with a plastic tray lined in waxy paper, which I thought would be a great tool for getting the donuts in and out of the oven:
I replaced the cap on the glaze resin with the extra nozzle, so that I could get more precision:
I drizzled a bit of resin on each donut:
And then I got out the berry cereal:
I tried sprinkling some of the cereal onto the donuts with my fingers, but this was not precise enough; the rings fell in big clumps:
 |
| That's not good. |
So I used the tweezers to strategically place all of the cereal rings. As I was doing this, a lot of resin leaked down on to the tray paper. I was worried that when the resin cured, the donuts would be permanently stuck to the paper, so I took the donuts off the tray:
 |
| That's a big mess. |
I put a fresh piece of paper onto the tray and popped the donuts into the oven!
 |
| Time to make the donuts! |
The oven knob on the far right is actually a button, and when this button is pressed, a light on the left side turns on, revealing a five minute timer:
The minutes don't actually tick down on this timer, but after five minutes the light goes off:
 |
| That means it's done! |
I pulled the donuts out...
And they were still really sticky. Like, completely unchanged. I put them back into the oven for another five minutes, and they were sticky after that, too. I put them in for a third five minutes, but nothing happened.
I double-checked the instructions, swapped out the batteries, checked the oven door connection, and tried one more time...nope. My oven does not work. That's a huge bummer for a $40 toy. I'd been counting on using this oven for most of today's review.
Imagine getting this as a Christmas gift, in a snowy climate, with tons of recipes that you want to make, and it never works? Not good.
I cured the donuts outside in the sun, and then I used the rest of the berry rings and the rest of the glaze to make a bowl of cereal--which I also cured outside:
Here are the completed donuts:
And the cereal:
 |
| It was hard to eliminate all of the air bubbles. |
The food is okay, but not as good as the strawberry milkshake. And the broken oven is unacceptable. It would have been so useful to have a way to cure the Miniverse items indoors or during the winter. Without that feature, I just have an overpriced plastic kitchen.
For under $40, I prefer the four-piece battery-powered plastic Power TRC kitchen that Lena tested out
back in March:
But the Miniverse kitchen isn't bad. It's solid (no cardboard backing like the Power TRC kitchen), bright and cheery, and is a nice way to display and store the miniature food:
I do wish that the food items were all in the same scale, though. The large jar of coco-berry milk is out of place:
The donuts are a good size for Lena:
 |
| Maybe a little big? |
And the cereal is also a little big, but still believable:
 |
| Hey, I like a big bowl of cereal! |
But that coco-berry milk is gigantic:
 |
| This weighs more than my head. |
I was eager to try out some different food recipes, so I purchased the Miniverse multi-pack, which boasts 30 pieces and at least five different types of food, most of which are visible through the window of the box:
 |
| Miniverse multi-pack, $29.99. |
The back of the box has photographs of all the food, too:
The set includes pink lemonade, a spumoni sundae, a Hawaiian pizza, banana berry waffles, and Marshmall-os cereal:
There are photographs of each of the five completed dishes at the bottom of the box:
The pink lemonade and cereal bowl seem repetitive from the food I got with the kitchen, but I was excited about the ice cream, pizza, and waffles.
I like how the box shows random mixtures of the different ingredients, too, like an ice cream pizza or a waffle sundae:
 |
| Think outside the box! |
This encourages kids to be creative, which I love. That said, I'll stick to the recipes for this review, so we can see if the items turn out as advertised.
All of the ingredients were held against the cardboard backdrop by a plastic shell. All I had to do was peel off the shell and everything came free:
Before I started assembling the recipes, I wanted to see what was in those two surprise boxes!
The first container held a tissue paper bundle:
This had some bread, a pizza cutter, and also tweezers and a narrow nozzle for the resin bottles:
The bread is great. I love the little plastic clip...even though it's hard to get all of the bag enclosed within the grips:
There's some nice painted detail on each slice of bread, too:
And of course the bread bag has a nutrition label on the back:
 |
| 100% fun buns! |
The tiny print at the bottom of this label says, "Daily Value is based on how much fun it is to make this mini." That's awesome.
I didn't make anything with the bread, though, because I like how it looks in the bag.
The second mystery box had a bunch of paper inside of it:
 |
| 0% fun buns. |
The papers were all tucked inside of a cardboard recipe box.
There are some little placemats and coasters to use with the food items:
There's also a sheet with all of the recipes for the food, plus three bulky instruction manuals (in three languages):
The instruction manuals are the same as what you'd get inside of a Miniverse surprise ball:
Once all of the instruction pamphlets are removed, the recipe box can be used to hold recipes...although it looks pretty empty with just the one sheet:
I'll go through these recipes fairly quickly, so you can see all of the included ingredient items and get a sense for the variety in the food.
First are the bananaberry waffles...a name that takes a lot of words to write in French!
 |
| "Banana and red fruit waffles." |
Here are all of the ingredients:
The carton of strawberries and bananas is great:
And I love all of the detail on the waffle box!
There's another tiny nutrition label on the back:
I got a little obsessed with these nutrition labels, not gonna lie. The Daily Value categories are specific to the waffles and include things like Berry Fun and Vitamin Yum:
 |
| And a lot of ooh la la. |
And the tiny text at the bottom is a repeat of "Daily Value is based on how much fun you'll have while making this mini."
The set actually comes with two strawberry waffles, one of which was stored inside of the box:
The resin for this recipe comes in a maple syrup bottle, and there are some chocolate chips for topping:
The maple syrup bottle also has a nutrition label:
This one has the "tiny quotient" phrase that I don't understand:
 |
| I'm also not sure what "sea-sun-ing" is. |
Oh--never mind. I get it. It's like seasoning, but with "sun" in it. Dad called. He wants his joke back.
The lid on the chocolate chip container comes off:
And the tiny chips can be shaken out:
 |
| That's incredible. |
I also chose to use the plastic fork for the waffles, as suggested by the recipe.
I won't go into the details of making this waffle dish, but I only used one waffle, so that I could still have one to store in the cute box.
I think this is one of the more realistic food items, since the consistency and opacity of the resin is perfect for maple syrup:
 |
| That almost looks real. |
Also, assembling everything on a large plate like this reduces the mess considerably. The waffles are my overwhelming favorite so far. They're great.
I decided not to make the cereal bowl, since it's so similar to the one I already made, but I'll quickly show you the ingredients:
It's pretty basic: more like one of the $7 Café surprise balls than the $10 Diner Series.
There's a box of Marshmall-os, a clear bowl, and a carton of almond milk resin. Two spoons and a fork came packaged with this recipe, but only one spoon is necessary for the cereal--the other utensils are for different foods.
The cereal box is really great, with a marshmallow-hunting game on the back:
And a nutrition label!
It was pretty hard to focus on this one, but its the quotient statement again:
 |
| Something must have gotten lost in translation here. |
The almond milk resin comes in a green carton:
With a nutrition label on one side:
At around this point I figured out that the tiny text at the bottom of the nutrition labels is always one of the two phrases that we've already seen. I was hoping there'd be more variety, since it feels like a treasure hunt to decipher that microscopic text, but it's still a wonderful detail.
The next recipe that I made was the Hawaiian pizza:
Hawaiian pizza is never my go-to order at a restaurant, but this kit looked really fun and has a lot of pieces:
The resin comes in a cheese sauce bottle:
This looks more like Cheese Whiz to me than mozzarella...with a picture of Swiss cheese on the front. Do people really put orange cheese (or Swiss cheese?) on pizza? Maybe I need to get out more. Or maybe not.
There are two plastic cartons, one with ham and another with pineapple:
The ham (or maybe bad pepperoni?) doesn't look very realistic, but the pineapple is great:
The pizza crust comes in a bag...with a nutrition label on the back!
 |
| Sauciness and Pizzazz! |
The crust itself has a browned edge and some red sauce swirled on top:
The bottom has a realistic toasty pattern:
And the crust fits perfectly into the cardboard box:
 |
| Just add some real cheese and I'm good. |
I assembled the pizza according to the directions, and it looks...okay:
 |
| I would not eat that. |
It's nowhere near as good as a handmade dollhouse pizza that I found on Etsy:
 |
| I would totally eat that. |
This is as good a time as any to talk more about the pricing on these Miniverse sets. The food items that come in surprise balls costs $10 each, and the recipes in the multi-pack work out to more like $6-7 each. $6 is very reasonable, but $10 feels like a lot for one item of miniature food. The waffles might be worth that to me, but not the other things I've made so far. As a reference point, the gorgeous Etsy pizza, above, cost $13.
We also have to factor in the art project value of these toys, though--and the leftover mini ingredients. I think if you enjoy the creative process of making the food, and have a way to use the leftover ingredients, then the prices are more justifiable.
Anyway, the Miniverse pizza is a little small for Lena, which is too bad, although I suppose it'd be a believable personal pizza for someone her scale:
 |
| Guess I'm eating alone tonight. |
The next recipe I made was the spumoni sundae:
I had to look up what a spumoni sundae is. There's some contradictory information on the web, but this Italian dessert is typically made from three flavors of low-fat gelato: pistachio, cherry, and chocolate. The gelato is blended with whipped cream for a light, airy texture. Sometimes fruits, nuts, and even amaretto cookies are added. It sounds pretty good to me!
The Miniverse kit includes ice cream, whipped cream, chocolate sauce, and a fancy bowl. There is an extra spoon that I could have included, too:
 |
| Now I'm getting hungry. |
The scoops of vinyl ice cream can be stored in a decorated ice cream tub:
I love the nutritional label, of course:
And the happy cow design:
The dollops of whipped cream are also stored in their own container, and each little bit of whipped cream has a cherry on top:
 |
| I wish the cherries were separate, but that's okay. |
The resin for this recipe comes in the form of chocolate syrup. I'm not sure if chocolate syrup is an official part of a spumoni sundae, but it certainly tastes good on ice cream:
 |
| A chocolate eclipse of the sun. |
The chocolate syrup has a repeat of the nutrition label we saw on the maple syrup:
 |
| More sea-sun-ing. |
I had a hard time making this recipe. I didn't replace the bottle lid with the narrower nozzle, and so the resin poured out in big clumps and didn't look like chocolate sauce at all. And the sauce concealed most of the colorful ice cream.
I wanted to see if it was possible to fix my mistake, so I took everything out of the bowl, attached the narrow spout to the resin bottle, and attempted a do-over. This created a big sticky mess:
 |
| In over my head. |
My second attempt was slightly better, but it was still hard to control the chocolate sauce.
 |
| That's a convincing sundae, though. |
The frustrating thing about resin, especially when a project gets messy like this, is that nothing can be washed off. When the tweezers get sticky, for instance, I have to cure them in the sun. In fact, I had to take a lot of things outside at the end of this project to cure the excess residue so that it didn't keep getting all over my hands or onto surfaces of my house.
It's not a huge deal, I guess, but just a different way of thinking about clean-up.
But it's also worth mentioning that at this stage of the review, after I'd made a lot of resin food in a short period of time, that the smell and mess of the resin was really starting to get to me. When I did the Patreon review and made only one milkshake, the smell was only a mild annoyance. But on this particular day, it started to become a big problem. I had to open the windows of my house, turn on some fans, and be really careful about how I sealed off all of the garbage bags with resin in them. And it was getting harder to remove the resin smell from my hands. But I kept going.
The last recipe in the multi-pack was the pink lemonade, and this looked very similar to my coco-berry milk from earlier:
Here are all of the ingredients:
 |
| A bit repetitive. |
The ice bag is the same as what we saw before, but the carton with lemon slices and mint leaves is new and looks really good:
 |
| Those lemon slices are perfect. |
The resin bottle is meant to look like a jug of lemonade, but it's not very impressive. The design on the front has a sticker that peels off really easily:
But at least there's a nutrition label!
 |
| "Squeeze the day" is awesome. How is that not a juice company's tagline? |
I assembled the lemonade using the same steps that I used for the coco-berry milk, and it came out pretty well:
I was a little underwhelmed by the variety that I got with the kitchen and the multi-pack sets. Rather than having two drinks in those massive mugs, I wish I'd gotten something like a fruit tart:
 |
| I love everything about this set. |
The resin doesn't look realistic in all of the foods, but it's really well-suited to things like glaze-based fruit desserts. This banana cream pie looks great, too:
I also really want to know if the pies are compatible with Lena.
Eager to find at least one pie or cake, I tried my luck with three more surprise balls--one from the smaller Café Series and two from the Diner Series:
 |
| Café Series ball (left) and Diner Series ball (right). |
In the first Diner Series ball, I got a unicorn sundae!
 |
| I love unicorns! |
As much as I like unicorns, I was disappointed by this, since I had another ice cream set already. But my disappointment didn't last very long. Look at all of the fun things in this recipe:
I love the waffle bowl that comes in its own cardboard box, and the tiny jar of sprinkles is amazing!
This sundae turned out much better than the spumoni. Here it is displayed on the white plastic table that comes with all of the Diner sets:
And here's the sundae again after it was cured:
 |
| That looks pretty yummy. If you like pink. |
Incidentally, the tables that come with the Diner Series balls are way too small for a 1:6 scale doll like Lena:
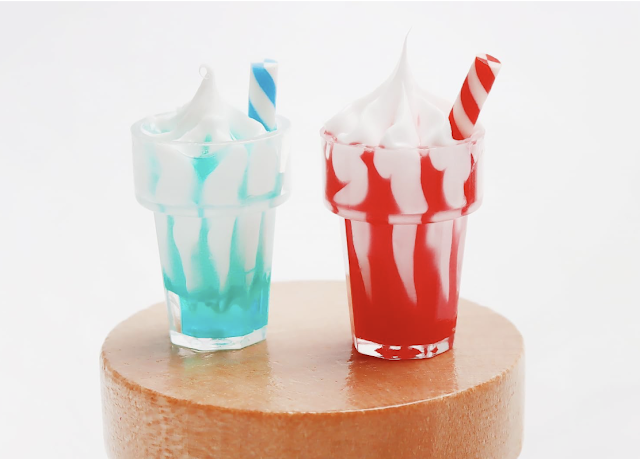
My second Diner Series ball contained a mint chip shake. This is very similar to the strawberry milkshake that I made for the Patreon review:
Here are the ingredients--all of which I've seen some variant of before:
The shake turned out pretty well, but again, the resin is not opaque enough to look like a real, creamy milkshake.
It looks more like green slime:
 |
| Ew. |
I don't know if any of you have seen the movie Better off Dead, with John Cusack, but this milkshake reminds me of the raisin dinner scene, where Lane's mom serves up one of her, ah, more creative dishes:
 |
| It has raisins in it. You like raisins. |
In my very last chance to get a dessert or another different kind of food, I opened up the small Café ball. And I got another drink. Of course. This time it's strawberry boba:
I've never consumed boba tea or bubble tea, but I've seen it. It looks like a creamy drink with dark tapioca balls at the bottom:
This set has simpler ingredients than the Diner sets, and only includes a cup, a huge straw, some ice, some boba balls, and of course the resin:
This recipe was really easy to mix, and I think the result is good:
 |
| It certainly looks like bubble tea. |
But, as with all of the drinks, the scale is way too big for Lena:
 |
| These bobas are as big as my eyeballs. |
At this point I had to stop myself. Not just because the resin was getting to me, but because I'd spent a grand total of $96 on these toys. With tax, that's over $100. And I'm not sure I have $100 worth of mini food to show for it. Gulp.
The other thing that was on my mind at this point is how the Miniverse kits are being sold. They're on the shelves of the toy aisles, literally mixed in with other surprise balls and doll accessories. There's very little outward indication that the toy will require strict adult supervision and careful clean-up. I can imagine the horror of a parent realizing the nature of these toys only after resin fumes come wafting out of the playroom. Perhaps the Miniverse sets would be more at home in the crafting aisle?
Anyway, one of my primary objectives with this review was to see how useful the Miniverse food is to somebody like Lena, so let's finish up by summarizing that.
First of all, her kitchen is better-stocked now than it used to be:
I made an effort to limit the ingredients I added to the resin so that I could keep some things for display. For example, I didn't use many sprinkles or chocolate chips, so those containers still look mostly full. I also tried to leave fruit or cookies in each plastic carton.
The Make It Mini Kitchen isn't much use to Lena since it's so small (and broken). And even though it fits easily into the Rainbow High House, it's not as good as the original kitchen pieces:
 |
| And it clashes with the walls. |
The resin-based food items are a mixed bag. All of the drinks that I made are too big for Lena, although the two milkshakes are more believable than the rest:
 |
| I can't work with any of this, Emily. |
On the other hand, some of the food works quite well with Lena. I think the cereal bowl and the donuts are believable:
 |
| Now we're talking! |
And the waffles are nearly perfect:
 |
| I could get used to a breakfast like this. |
And the ice cream sundaes look good, but Lena insists that it's way more ice cream than she'd ever eat on her own:
 |
| I couldn't possibly. |
In fact, she was feeling overwhelmed by all of the new food in her kitchen, so she invited her sister Sela over for a dessert binge:
 |
| Oh, gosh, Lena! This looks so amazing! |
They had quite a spread:
 |
| How should we divide this up? |
Sela dove into the spumoni sundae and Lena grabbed for the waffle:
And there was plenty of extra whipped cream and toppings to go around:
I would have bet that those two couldn't finish all of that sweet food, but they did it! Still, I don't want to hear any complaints about stomach aches tonight.
 |
| I can't believe we ate the whole thing. |
Bottom line? My initial experience with Miniverse products was good, and left me wanting more. I enjoyed the process of making the little strawberry milkshake for that Patreon review, and I think the end result, while not perfect, looks better than some mass-produced minis. I also adore how the plastic ingredients are packaged. One disappointment was that the scale of the milkshake isn't quite right for Lena and her friends.
Scale became an even bigger issue as I explored more Miniverse products. I wish I could say that all of the items are compatible with either 1:6 scale or dollhouse scale, but that is not the case. All of the drinks I made are too big for Lena, but the Make It Mini Kitchen is too small--as are the plastic tables that come with the surprise balls. Fortunately, at least a few of the resin food items are a good fit for Lena, and many of the ingredient accessories work well, too. In fact, I was able to preserve most of the plastic ingredients and use them in Lena's kitchen. Those plastic ingredients (with their little nutrition labels!) are my favorite thing about Miniverse.
The Miniverse Make It Mini Kitchen, with its ultraviolet oven, was meant to be the star of this review, but it ended up being a let-down. My experience with trying to cure resin on a cloudy day made me see the value of an indoor curing oven, and I was excited to use it. But the oven did not work. I tried many times and used every trick I could think of (new batteries, pressure on the door, multiple sessions) but nothing helped. It was non-functional from the start. In the absence of the ultraviolet oven, the kitchen is still cute, with lots of moving parts, a few good food items, and a fun, colorful design, but it isn't worth the $40 price tag.
The food multi-pack that I bought was a solid purchase, and certainly a more economical way of collecting ingredients than by purchasing individual $10 surprise balls. It was fun to make all of the different kinds of food, and I think that the waffles, pizza, and ice cream brought something new to the table. I also got a nice variety of plastic ingredients from this set (the slices of bread, the chocolate chips, the whipped cream, and lots of fruit cartons) that look great in Lena's fridge. The kitchen and the multi-pack seemed like an obvious pairing to me at first, but the repetition in food types detracted a bit from the value of owning both sets.
The problem with the multi-pack, and with my greed in buying so many of these sets in general, is that as I spent more time around the resin, I became increasingly aware of the unpleasantness (and perhaps health hazard) of working with this substance. I used the tweezers and tried to be very careful as I was preparing the food, but my fingers always got some resin on them. And as soon as there was resin on my fingers--even a tiny bit--I'd have to immediately get up to wash off, otherwise the resin would spread around to everything I touched. Since resin doesn't dry without ultraviolet light, and because it can't be wiped away with a cloth or washed away with soap and water, I felt like I was constantly standing at the sink, dousing my hands with rubbing alcohol. I was also frequently putting items out in the sun to cure the resin that got onto them by accident. I should have worn gloves, I know, but my dexterity would have been impaired, and I would have had to change the gloves frequently to keep from spreading resin around. The other problem with resin is the smell. It smells really bad to me, and after I'd made several pieces of food in a row, it took a long time for the accumulated fumes to leave my house. I had to open the windows, turn on a fan, and take out the garbage with all of the leftover resin bottles and debris. Any resin food that isn't completely cured will smell, too, and it's hard to know when a piece is fully hardened. What's more, despite surgeon-caliber hand washing, it took all day for my hands to smell normal again. All of this makes me feel very strongly that the Miniverse sets are better suited to the craft aisle than the toy aisle. Parents could easily get in way over their heads thinking that they'd bought a more typical surprise ball toy for their child.
For whatever crazy reason, though, I still find myself thinking about buying another Miniverse ball. There's something addictive and satisfying about the food assembly process. And the whole idea behind these toys is admirably unique. But the prices are high, and the quality of the resulting miniature varies greatly. Some of the items (especially the drinks) are not worth their price. The creative, do-it-yourself element enhances the value of these sets, but the complexities of working with resin undermines that value. For me, it's the unaltered miniature ingredients that have the most enduring appeal. So while I might be tempted to acquire more Miniverse sets in the future, I'll leave the resin in its bottle.


My sister (31) and I (25) love making these sets! I can definitely see mess being an issue especially with kids, though. The UV light not working is wicked disappointing. If you do decide to keep doing more sets for fun, I would recommend investing in a nail lamp! I already had one and it's perfect for curing small resin items like these, and they can be bought for cheap on Amazon, especially if you get a small one.
ReplyDelete> Do people really put orange cheese (or Swiss cheese?) on pizza?
ReplyDeleteYes, yes they do. Our local pizza place makes a Philly Cheese pizza that's even better leftover than it is fresh, and it's mind-blowing hot out of the box.
Interesting review! I'd never heard of these sets, nor seen them.
ReplyDeleteI agree these could be a big problem for kids who aren't provided supervision. :/
That one cafe set with the little milk carton reminds me of a Liv doll breakfast set I loved so much, I could never bring myself to take it out of the package.
As for that one oft-appearing strange line in the nutrition labels: I kept reading it in an almost meme-speak tone, yet with a faint hint of the Russian reversal, a'la, "In Soviet Russia, car drives you!"
So, "Daily Value is based on how much; it's tiny quotient!"
Of course, I had to add a semicolon and take away the possessiveness of 'its' to give the line a somewhat clearer sense of humor. Otherwise, I can't understand it, either, LOL.
I do like the toy kitchen. The yellow background with the cat is pleasing. I'd buy this on clearance for a Bratz Boyz to bake cereal.
I'm sorry the oven didn't work. That definitely zaps the fun out of it.
I have respiratory problems, so I follow a resin-free approach that includes clear drying glue and various colors and concentrations of paint for tint and opacity. (I got the hint from MyFroggyStuff on YouTube). Of course, I am not doing reviews but I loved the idea of these sets and looked for a way to avoid the resin. Another bonus is that I can let a sample dry and see how it will look before I use it on my kit and the glue is water soluble.
ReplyDeleteIs the coco in coco-berry milk meant to imply it’s a coconut milk based drink, perhaps?
ReplyDeleteI had fun with one of these, but as you say-the couple other surprise balls I bought for the mini ingredients rather than the project. Scale can be frustrating for collectors, especially when something is too small for American Girl sized dolls but too large for Barbie sized ones!
ReplyDeleteLuckily I sometimes collect minis just to collect them, such as Rement.
Loved the review, hope you had fun! -Micah
The French on the coco-berry packaging translates to coconut. I agree, the concept is cool, but the process might be unwieldy for some families, which is disappointing.
ReplyDeleteThe youtube channel Myfroggystuff made some of these resin foods, but used mod podge mixed with paint, instead of resin, and it worked pretty ok.
ReplyDeleteI feel like the scaling on these might work better with Rainbow High or Bratz dolls - they're shorter than Barbie so the kitchen won't look as small, and the bigger heads might make the drinks seem more in proportion...? Just a guess, though. This was a really fun review!
ReplyDeleteI was thinking this too, a more cartoony doll shape might match the mini food better. Great review, the Better Off Dead screenshot had me laughing. I agree the resin looks best when the food is supposed to be translucent in real life. Thanks for the review.
Deletethat pink sundae turned out looking incredible, and the waffles, too. I like that they give a lot of extra ingredients so you can keep them; the tiny labels are adorable. a shame there's so much repetition. :(
ReplyDeleteThis was really fun! I have to say that huge sundae isn't that unbelievably out-of-scale to me; there's an old-fashioned ice cream parlor my mom loves that serves ice cream sodas in huge stout glass cups, so this reminds me of those. Have you ever seen Kitchen Littles stuff? It came out in the late 90's (at least that's when I got mine) and there was a really neat kitchen, refrigerator and stove, and tons of sets you could get of food and dishes. It looked pretty realistic (with actual brand names on the packaging in some cases) and I think it was scaled for Barbie size dolls. Lena might want to look into that!
ReplyDeleteBecky'sTwinn
I pounced on that Kitchen Littles suggestion like a cat! Lena and I thank you!! :)
DeleteThanks for the extensive review! I've been curious about the scale of the Miniverse kitchen. Guess I'm striking it from my potential wishlist. Such a bummer it didn't even work though!
ReplyDeleteI bought three miniverse balls from the same display in a local toy store (two right next to each other and one further away) and pulled... three identical orange soda floats. Left me absolutely speechless! I was able to customize one of the drinks by adding a bit of acrylic paint to the resin, but still, not a happy experience.
Oh!! The Better off Dead reference made me chortle. Did not expect that. :)
DeleteI’m an adult and I’ve made quite a few of these! The drinks do look better with Rainbow High dolls since they have more cartoon-like proportions. These kits are really messy! I love the miniatures and they’re really fun, but the resin is just so difficult to deal with! The clear glue idea sounds a lot better, even if the drying time is extended. I would only let a careful teen make this solo. The odor and stickiness is too much for a younger child, and the resin has a lot of potential to damage furniture or clothing because it’s so difficult to clean. I would not be happy if I found my 6 or 7 year old with this! Plus, the tiny pieces are a choking hazard, and I couldn’t trust an elementary age child to keep it away from younger siblings. So I really do like these kits, but I definitely agree that they should be in the craft aisle. And perhaps, to lean into the more mature age range, they should switch up their packaging!
ReplyDeleteThe coco part of coco-berry usually means that the drink was made with coconut milk or coconut water!
ReplyDeleteSo annoying that the UV light in the kitchen doesn't work. It might be worth trying to contact MGA customer service?
ReplyDeleteLike others mentioned, MyFroggyStuff and also PoppyseedMini used alternatives to resin when assembling the food, as well.as showing how to craft some similar items. Definitely the route I would take.
I wonder if the weird phrase is meant to mean tininess quotient, as in how small of a scale it is?
My favourite part of the review is all the adorable packaging on the bottles and boxes. Cuteness overload!
ReplyDeleteOh my goodness, child me would have loved this, and adult me is losing her mind! The detail, care and thought put into these is amazing to me! Tiny fruit, ice, even sprinkles! I just love tiny things, and seeing that they went all the way to even making the packaging like the real item, made tiny is marvelous. I appreciate extras being included too, so you can make the kit, but still enjoy tiny items on their own.
ReplyDeleteThat resin though. Oh dear. It's very on trend right now,I get why they've jumped on it, but for children it is not, for all the reasons you've found.
Too big or not, Lena's kitchen is well stocked with treats now, though!
I love mini verses too they are soo cool
ReplyDeleteI can't stop searching for them
ReplyDeleteBecause I want mini verses for Christmas 🎁⛄ 🎄
ReplyDeleteAnd it is 45 days until Christmas
ReplyDeleteThese kits remind me of ReMent blind box minis. They are Japanese mini, not to scale (must fit into box scale), that have a lot of mini food as well as other items. Back when I collected them, 2000’s, I think they were $4-5 a box. So the prices on these toys seems kinda reasonable with inflation, maybe.
ReplyDeleteAs a momma, I would NOT want my 8 year old doing this. I can see my 12 year old being interested -- but I'd still want it to be a parent monitored process. So I'd be happier with these in the craft store and/or with a higher age on it. (When aunts and uncles buy presents, they really look at those age levels to decide what is appropriate)
ReplyDelete☆☆During Christmas I bought six Multiverse Kitchens with Oven mitts and projects. They were approximately $39.99.-$52. per set depending on were I purchased them. The ovens were a hit until we started playing with it . Then it was disappointing. They UV oven light did not work well. The kitchen storage was cute but the main reason to buy it was the oven.
ReplyDelete(I purchased a UV light at *Five Below for $4.00. Which made a Huge Difference with the projects.) If you are going to continue making these ***the oven needs fixed)
Also purchased was (7) Miniverse sets with the 5 projects. Cost per set was $23. -$25.00. One of these sets were for me, Iam 55. I enjoyed the projects. The resin is sticky and the age limit says 8+. I would think that children would absolutely need adult supervision. (Resin is toxic.) I bought these for ages 8-11. I think these are for children older than age 8.
The good thing about the miniverse kitchen is that you can use any old bits of wallpaper to slide in and decorate the back wall, I used the packaging and have black and white tiles behind my sink. I also used four of the miniverse table / cake stands and hot glued them large end up to the base of the kitchen unit giving it a retro feel and now it's high enough for Barbie
ReplyDeleteEven though they aren’t all exactly to scale, my 9 year old daughter and I do these together for her Barbie collection. We watched a TON of videos on YouTube by NerdECrafter, and she repeatedly states to use gloves and a UV light (although she doesn’t use gloves herself.) Alcohol swabs are the best thing for quick cleanups, although larger spills may require the use of a bottle, we’ve just never had to. We also use a silicon mat so that we can cure any loose drips of resin and easily throw them out. We got toothpicks to help direct the flow of the resin, or placement of items. It may sound like a lot of extra equipment, but if it’s something you see yourself doing as a hobby, the low investment of $35 (UV light, mat, toothpicks, gloves, alcohol swabs) is worthwhile. We have an absolute blast with these and it’s a great bonding experience. We do limit ourselves to doing 3 at a time though so the fumes don’t get to us.
ReplyDeleteHey I heard you can make it Barbie size by lifting the kitchen up a bit with foam board. I love your posts they are super helpful!
ReplyDeleteLooks like you had some fun there. Unfortunately I'm reacting to a lot of things, so I won't be able to try out something like this. But it also looks like miniverse have some competitions. It seems like "mini world surprise" is similars but smaller and lower price. Zuru also have their version too: "Mini brands create." but I suspect them to be closer to mini-verse in size. Don't know if you have seen it or not.
ReplyDelete