
Right around the time that my doll preferences started shifting towards child and fashion dolls, the "reborn" phenomenon emerged. The process of "reborning" (terrible word, if you ask me) originally involved taking an inexpensive play baby, like a Berenguer, and making it over to look more realistic. The makeover could include a new coat of paint, new eyes, new hair, or even a new weighted body--many of the things I attempted in the My Twinn Project. However, as reborning became more and more popular, several well-known artists and doll companies began offering unpainted doll kits (basically just vinyl heads and limbs) to replace play dolls as the starting point for this process. I've re-painted and re-wigged a few $15 Berenguer play dolls in my day, but I've never purchased one of these premium doll kits...until now!
My mission in this series is to complete a popular doll kit--the "Saskia" sculpt by Bonnie Brown. I will attempt to paint this doll, find her some nice eyes, micro-root her hair (ahh! I am so nervous about this part!), assemble her onto a weighted body, and dress her to look cute (that part will be fun). I can tell you already, it's gonna be a bumpy ride.
 |
| "Saskia" by Bonnie Brown. |
Before I start talking about Saskia, though, I have to tell you about something fun that I discovered during these searches. It's amazing and wonderful: certain artists offer surprise reborn babies for a discounted price. Everything about the baby can be a mystery--the mold, the gender, the coloring, the outfit...everything!! I can see the value of this approach for the artist, of course. They get to use a less-popular kit that might have been sitting around their studio for a while, and they also get to unleash their creative freedom. But the concept is also perfect and irresistible to me. I mean, it's a surprise baby! My favorite!
Here are a few of the listings that I found:
 |
| That's about $115 USD. |

Apparently, you can even buy a surprise "gothic" (zombie) doll if that's your thing:
 |
| That offers a different kind of surprise. |
Anyway, after a fair amount of searching, I found an artist on Etsy whose work looks good (and is affordable), and I ordered my own surprise reborn baby! Eeeee! I told the artist that it could be any gender, any ethnicity, any age, any sculpt...anything. I even told her that she could name the baby if she wanted. I hope she did!! The baby has already arrived at my house, but is still in the box. Opening that box will be our next Sunday Surprise! I have to say, waiting to open this particular box has been incredibly hard for me. I figured I'd have all of you join me in the suspense!


Unlike this mystery baby, Saskia has a name and a gender already. However, I'm sure she'll have her own fair share of surprises...especially given how little I know about reborning.
My Saskia kit arrived in a plain Priority Mail box:


My Saskia kit arrived in a plain Priority Mail box:

The doll parts were loose inside the shipping box, with the vinyl head and limbs wrapped in thin plastic.
Here are the bits and pieces of Saskia:
 |
| That's daunting. |
The little white cardboard box had a brush and comb inside. I'm not sure if all Saskia kits come with a brush and comb, or if it was a gift from the shop? In any case, Saskia has no hair (yet) so I set these aside.

Incidentally, I ordered my kit from Nonie's Angels Nursery and paid $112.50 (with shipping). Yes, that's right; these unfinished kits can cost over $100. To be fair, though, it is possible to get a kit for under $20 (Bountiful Baby has some less expensive options).
Perhaps this is a good moment to mention one of the main reasons I'm doing this project. Doll kits can be expensive--as expensive as a lot of (fully-assembled) high-end baby dolls. The kits are typically advertised with photographs of completed babies, and of course these examples have been painted and rooted by highly-experienced professional reborn artists. The completed dolls look amazing--see Saskia's prototype here as an example. It's easy to look at stunning photographs like this and think that $100 is a steal. The price seems especially good when you see that completed Saskia kits can sell for well over $1,000 on eBay--again, here's an example.
But my question is, what about the regular collectors who buy these kits and try to complete them? What kind of results can someone like me hope for? Also, how expensive is it to finish a kit? Starting with a $100 investment is a lot different than finding a cheap play doll and making it look better. So, one of my main goals here is to evaluate whether or not these doll kits are worth their price for a person with little or no reborn experience.
Saskia came with a certificate of authenticity. This postcard-sized insert has a photograph of an unpainted (but fully-assembled and dressed) Saskia:
 |
| She's really cute, even like that! |
The back of the certificate has some information about Saskia, including that she's from the second edition (the first edition sold out quickly and then got very expensive--$300 to $400--on the secondary market):

These editions are limited by time, not size, so whatever number of kits is sold between February and July, that's the edition size. I have no idea how large or small this number is for Saskia.
The certificate also mentions that Saskia requires 22mm eyes.
Doll kits do not always come with a cloth body, but Saskia's kit does. I was hugely relieved by this because I did not want to hunt around trying to find the right size and style body for her limbs. This body even comes with pre-threaded cable ties, which is awesome:

The body allows for full vinyl limbs. It has some gathering in the chest that looks like a bikini top. I suspect this will look more natural when the body is stuffed...or I hope so, anyway:

Saskia's head and limbs are made out of very soft vinyl. In fact, I was surprised to feel how pliable the body parts are. I was expecting something more like a Berenguer play doll--bendable, but not squishy. I've read that this soft vinyl is nice when it comes time to root the hair, though, so I'm happy about that.
Here are Saskia's legs:

The right leg is bent slightly at the knee:

The sculpting detail in the feet and toes is incredible. I very quickly started to get a sense for why this kit is both popular and pricey:


All of the little lines and creases look so real that I wondered for a minute if these limbs were live-cast (molded from a living baby). I don't think they are....they're just really well done.


The left leg is in a straightened position, with the toes extended as though Saskia is stretching her leg:

I love the little creases behind her knee!

The feet are just incredible:


Here are Saskia's arms:

The left arm is bent at the elbow and has a partially-fisted hand. The little creases in the arm are adorable:

Like the feet, the hands have a lot of detail:

I love the unusual shape of this hand--it's not a generic baby doll hand, that's for sure:


The right arm is also bent at the elbow and has an extended first finger:

 |
| Eureka! |
Again, the detail (especially in the palm of the hand) is very realistic:

Saskia's unusual head mold is the main reason why I selected her over the multitude of other doll kit options. There are a lot of sleeping newborn kits on the market, and--cute as they are--they all start to look the same to me after a while. Saskia is unique:

Her mouth is relaxed, hanging open with the left side drooping slightly more than the right. She seems to be playing with her tongue, rolling it up against the roof of her mouth:


Saskia's vinyl is very pale--more like the photos of the mouth, above, than the pictures of her whole head. My backdrop and/or lighting add a bit of a yellow cast to her coloring that isn't there in real life.
I love the asymmetries in this baby's face. One of her eyes is smaller than the other (which fits with the way she's holding her mouth). Her left and right profiles look very different because of her mouth position, too.


I love Saskia's ears--I always had a hard time sculpting ears back when I made clay babies:

I can't find any fault with this mold. The proportions all seem perfect to me. The large skull, the chubby chin, the neck wrinkles...it's all incredibly accurate.

I especially love the wrinkles at the back of the neck:

Bonnie Brown has signed this mold on the neck:

Saskia even has visible suture lines in her skull--since a newborn's head bones have not completely fused together yet:

I think these ridged, visible sutures are only present in very newborn babies--unless something goes wrong with the closure of the sutures. I thought Saskia must be a few months old, but I guess she's just a few days old.

After inspecting all of the incredible details in this mold, I felt extra pressure to complete the kit in a manner worthy of the original sculpting.
My first mission was to find Saskia some eyes. Those blank eye sockets freak me out. I think a lot of a doll's realism and personality comes from the eyes, so I wanted really good eyes for this kit. The acrylic eyes I used for the My Twinn project are surprisingly nice, but this time I went in search of high-quality glass eyes.
Saskia's certificate says that she needs 22mm eyes, but one of the doll shops recommends a smaller size based on their experience and customer feedback. I decided to take this advice and try 20mm eyes first. I found some beautiful-looking mouth-blown glass eyes that cost about $35:

These are full round eyes with stems at the back. They look good from a distance:

I used to buy a lot of German mouth-blown eyes for my clay babies, and none of them ever looked quite like this, though. Look at the area just around the iris:

The eyes are not spherical. There's a raised, dense area all around the iris--as if the white part of the eye (the sclera) was mouth-blown around a pre-made glass iris:
 |
| Do you see how the silhouette of the sclera is not smooth? It's weird. |
The other problem I have with these eyes is that the pupil has no depth--it's right up against the surface of the eye. This is really hard to photograph:

Maybe a bit of an angle will help--the swirls and colors of the iris have some depth to them, but that dark pupil is right smack up against the surface of the eye. It does not look realistic.

I ordered those eyes before the Saskia kit arrived. If I had waited and looked at the kit before I ordered the eyes, I would have noticed that Saskia has sealed eye chambers--like a My Twinn doll:

Here's a picture of the inside of her head where you can see the flattened backs of the eye sockets:

The shape of those sockets means that this kit requires half round eyes that will be inserted from the front of the doll's face...just like the My Twinns.
So, I spent another $35 on some beautiful glass half-round eyes from Dolls by Sandie (one of my favorite shops). Sandie is super-nice and her shipping is incredibly fast. It's the perfect store for impatient people like me. Here are the eyes:

These are German Lauscha green/grey eyes in 20mm:
 |
| German Lauscha "grey/green" flat back eyes, 20mm. |
When I first saw them, I thought they'd be perfect:
 |
| Gorgeous! |
In contrast to the full-round eyes I showed you, these have some lovely depth in the iris and pupil:

Again--it's difficult to photograph, but maybe you can see that the pupil is set back in from the surface of the eye. There are even some tiny air bubbles that sit between the pupil and the front of the eye:

You can contrast that directly with the other eye:
I heated Saskia's head with a hair dryer before I attempted to insert the eyes, but I'm not really sure this was necessary. Her vinyl is so soft, the eyes slide right in. Putting these eyes in was nothing like my experience with the My Twinn dolls:

The back of the eye socket is also soft vinyl, though, so the eyes don't immediately snap into the perfect position. It takes a little pushing and pulling and stretching (and poking with a screwdriver...) to get them well-aligned:
 |
| Not quite... |
Here she is with her glass eyes!
 |
| There! |
Hm.
I wasn't completely happy, though. These eyes look a lot darker when they're in the doll's head. I don't mind dark eyes (they're authentic for a newborn) but it's really hard to see the pupil, and so the eyes end up looking vacant and buggy from some angles. The dark colored iris also makes the whole eye look too big.

When I zoom in with the camera, the details of the eye are more clear, but I don't like the effect from a distance.

I went back to Dolls by Sandie and looked around for a lighter color. The light blue shades were sold out at the time, so I opted for green. This is probably not a realistic color for a newborn's eyes, but I like green eyes.
 |
| German Lauscha "green" flat back eyes, 20mm. |
These eyes are beautiful, but they look way lighter than what I was hoping for. I decided to pop them in and see how they look with Saskia's face.

Here she is with the green eyes:

The eyes are really light, and the pupils are smaller than the pupils on the grey/green eyes. Also, the lighter color exacerbates the asymmetry in Saskia's eye sockets. Her left eye looks a lot bigger now...almost in a distracting way:

I poked around and made sure the eyes were set as evenly as I could get them, and then I stepped away for a few days to think things over.
When I came back to re-examine the eyes, they looked fine. I scoured the internet for photographs of newborn babies, just to double-check the pupil size. I decided that these pupils look well within the range of normal--a little large, in fact.
So...Saskia finally had her eyes and I was ready to start painting!

I did a few things before I began to paint my Saskia kit. First, I chose a type of paint. Probably the most popular paint for soft vinyl kits are Genesis heat-set paints. These paints do not dry at room temperature, so there's lots of time to work and fix mistakes. However, in order for these paints to cure, they require some time in a 265 degree oven. I was not eager to put my Saskia in the oven for any reason, so I opted for the other popular choice: air dry paints. These are basically acrylics. I think I could have just used regular art store acrylics (that's what I used on the Berenguers...), but in order to increase my chances of a good outcome, I bought some pre-mixed colors and a sealant from the Miracle Blend line (again, I found these at Dolls by Sandie).
Next, I watched several online video tutorials. My favorite series is by the Still Moments Nursery in Australia. The directions are very clear and well-paced, and honestly I just like listening to Nikki Holland talk. I don't use the exact same supplies that she's using, but the techniques carry over between mediums.
The last thing I did was take a close look at the only reborn doll I own. This is a Sebilla Bos vinyl kit that was completed by Sebilla Bos herself. He was originally a little girl named Britt, but I've made him into a boy named Joey. He's dressed in BabyGap:
 |
| Completed Sebilla Bos reborn kit. |
Joey has beautiful glass eyes and rooted hair. I love how he's slightly cross-eyed. This effect is easier to accomplish with full-round glass eyes:

I was paying close attention to the colors and style of the paint. I don't tend to like reborn babies that are super-blotchy, but a little bit of this effect is fun. Ms. Bos did a good job:

Joey's hair is thinly rooted to look like a real newborn:

The process of rooting looks so hard to me. I actually tried to root a doll head several years ago, but I could not get a single hair to stay in the head. Not a single one. Since that attempt, I've watched several tutorials, so I might have some better luck (and better supplies) this time around. We'll see!

I've seen rooted reborn doll hair that's so meticulously well-done, it's indistinguishable from a real baby's hair. I'm not hoping for that level of realism at this stage. I'll be happy if Saskia's hair looks like Joey's.
I also looked carefully at Joey's hands and feet, just to see what the right level of blushing is on these realistic dolls.


So, little Joey will sit on the sidelines and be my inspiration as I embark on this project!

I assembled every doll-painting supply I own (some old things and some new) and set up camp at the dinner table:
 |
| I'm ready! |
First, here are the Miracle Blend paints that I bought:

These cost about $50. They're supposed to last me through several doll projects, though.
The two larger tubes are the sealant/primer and the skin base color. The tiny tubs are the colors that I (somewhat randomly) chose. I don't think I'll need all of them.
These paints are specifically designed for reborn dolls, and should stick nicely to the soft vinyl.


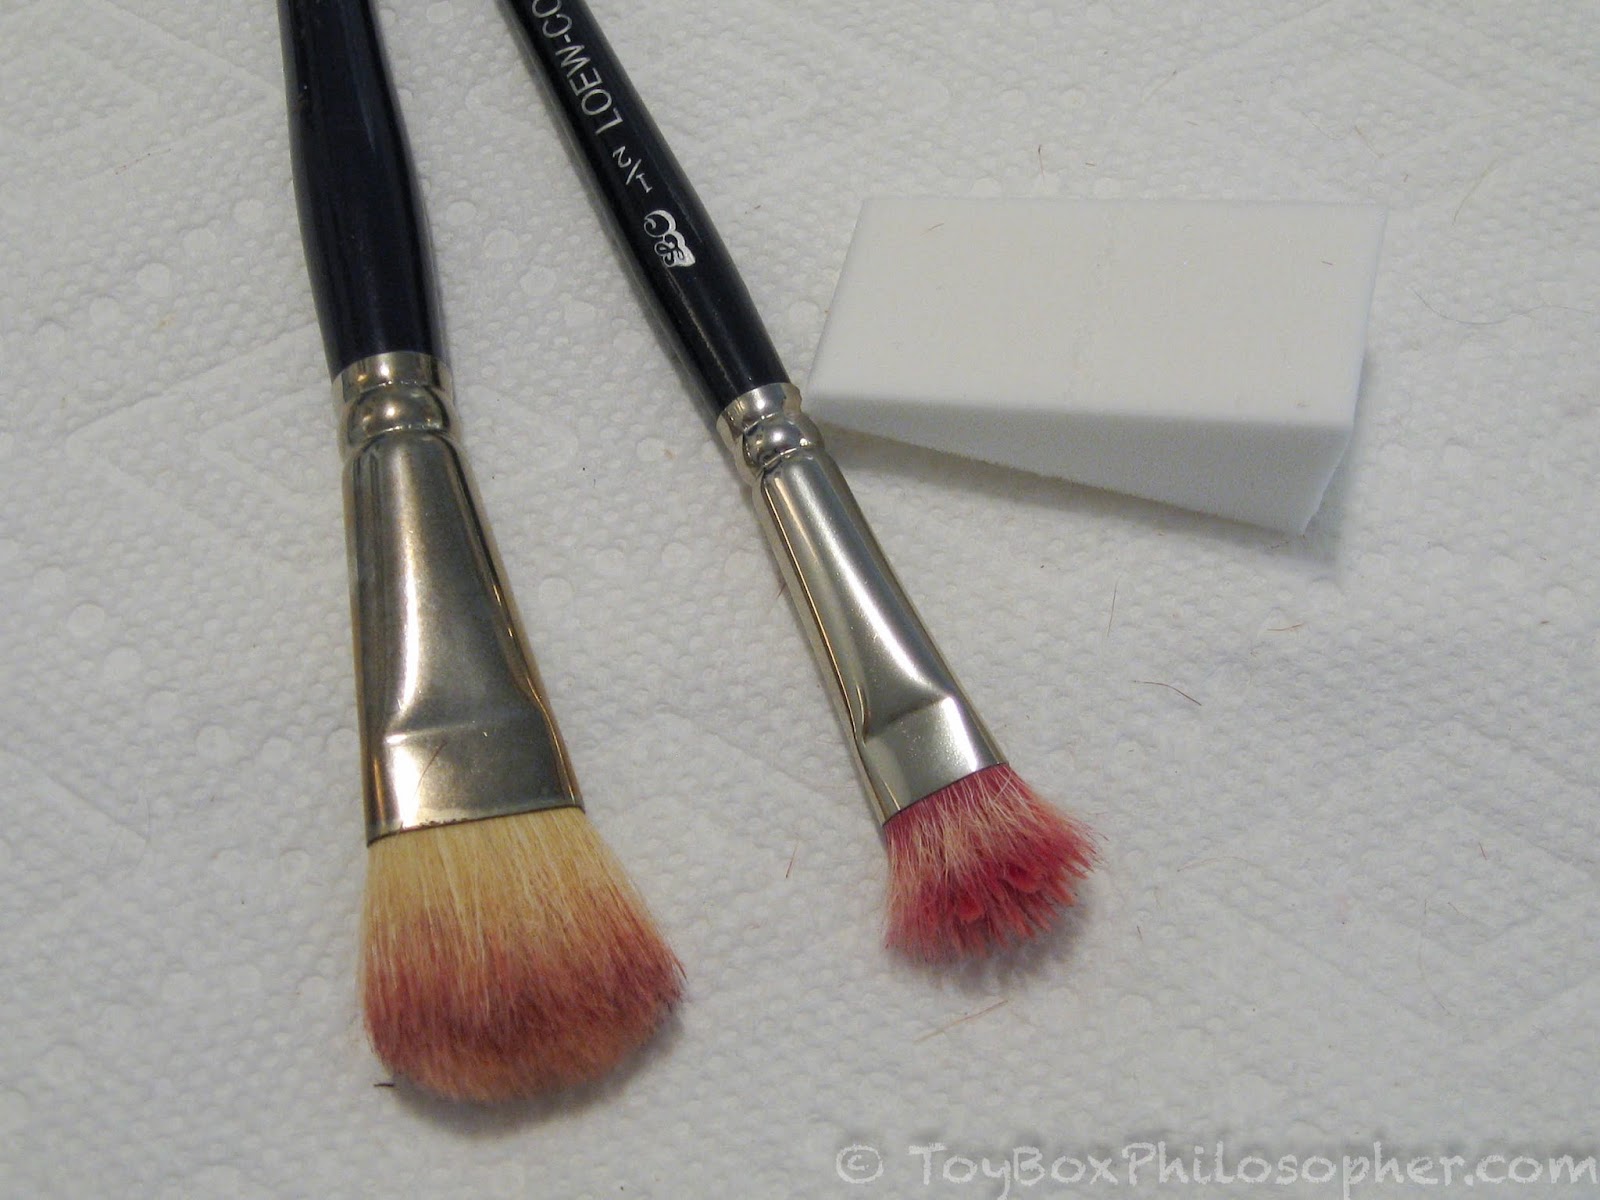
The other thing I accumulated in large number was mop brushes. I used many of these back in my clay baby days. They're essential for getting the right paint effects:

I also gathered up some sponges and sponge brushes...just in case:

And I grabbed a pack of generic mixing brushes from Walmart for about $2.00:

The tutorials that I watched also recommend these cosmetic wedges for layering the primer and sealant coats, so I bought some from Walmart (again, for around $2.00):

Then, I got started!
The first step was to wash the vinyl parts in mild soapy water, rinse them well, and let them air-dry. This step is to make sure that any residual oils or dirt won't interfere with the paint adhesion.
After the pieces were completely dry, I coated the vinyl with several layers of white primer. The primer is designed to make the paint stick better.

I used just a tiny dab of primer...

...and mixed it with about a tablespoon of water:

I used a cheap paintbrush to apply the primer to the vinyl:

Then, I'd take one of the cosmetic wedges and dab at the primer puddles until they were evenly distributed over the surface of the vinyl. I did this three or four times, but there was no visible change in the vinyl. It would look wet as I was applying...but then it would dry and look exactly the same as before I started. The primer might have added a slight sheen to the vinyl, but it was really subtle.
After letting the primer dry for a few hours, I mixed up some of the skin base coat. Again, I used a dime-sized amount of paint:

And mixed in a tablespoon or more of water. This might actually have been too much water:

I applied the paint with a brush. It's almost exactly the same color as the vinyl:

Once again, I'd blot away with the cosmetic wedges until the paint was evenly spread.

Pools of paint would accumulate in the creases and between the toes and fingers, like this:

So I'd use a dry paintbrush to wick the extra paint out of these small spaces.

After three or four layers of this skin base coat, I could not see any difference in the vinyl. It looked exactly the same as when I first started. At this point, I'd been painting for the better part of two days. Two days. Ugh.
So, for the next few coats, I added some "Crease Red" color to the skin base:

Still, though, I couldn't tell that I was applying any paint at all. Maybe the mixture was too thin?

There were some really faint pale dots that I could see as I was applying the paint. I tried to photograph these, but I don't think they're visible:


My husband swears that the vinyl had more of a "glow" after all of these coats, but I think he was just being nice.
I tried to capture the very faint (imaginary?) new texture after the vinyl was dry, but it still looks exactly the same as when I started:

I took Saskia into my studio to see if the bright lights could pick up any change in her appearance:

I guess maybe there was a very small change in color?
Before the skin base coast (left) and after (right).
There were also some faint little specks of concentrated color around the contoured parts of Saskia's face and limbs. It's not a lot, but it's there.

It was at this point that I realized something about the cosmetic wedges that I bought:

It says that they're infused with vitamin E. What?? How did I miss that? What does it even mean? If the vitamin E is formulated with any kind of oil, that would be really bad for the paint. Facepalm. I'd invested too much time at this point to go backwards, so I just hoped for the best and didn't use the wedges anymore. Not good.
Anyway, I lost some patience at this stage and decided to move on to use a few of the darker colors.
To highlight the creases in Saskia's limbs, I mixed Crease Red with Perfect Lip:

This made a dark purplish color:

I used a fine brush to apply the paint, and then used one of the mop brushes to dab the area and make sure the paint wasn't accumulating in harsh, thick lines.

I applied this mixture between the toes to see what it would look like. The effect is pretty faint--even after several layers:

After I finished painting the creases on one leg, I took this picture to contrast the painted leg with the unpainted one:

Can you tell which is which? It's pretty subtle--and mostly visible around the feet:

The foot on the left, above, has the creases painted. The other one has unpainted creases.
At this stage, I realized that I'd never be able to paint all of the doll's creases with one batch of paint, so I switched to using just the Crease Red--so the color would be consistent. I also got lazy and started smacking on big globs of paint, like this:
 |
| It pools beautifully in those fine lines! |
Then I'd blot away the excess before it had a chance to dry and look bad.
I took one of the legs into the studio for some better pictures:

There's just a tiny bit more depth and color to the creases now.


I repeated the crease-painting technique with the arms, again, using just the Crease Red color:

I was getting a bit more confident at this point, allowing gravity to help me move the paint where I wanted it to go and getting the layers applied more efficiently.

Here's a painted arm next to an unpainted one. It's a bit easier to tell which is which this time, I think:


After I had darkened the creases as much as I could stand (this is very fine, delicate work and it takes forever...or it took me forever), I moved on to start the blushing and mottling.
I should interject here that many reborn artists add a blue cast to their dolls' skin or drawn in individual veins. I did not feel up to this challenge...and I don't need my dolls to be that realistic. There's a wide range of realism in the reborn world. Many babies have spit bubbles in their mouths, white milia spots on their skin, various birthmarks, lots of blotchy mottling, or the purple/veined areas. It's fascinating to see this level of realism, but I'm going to stick with a more minimalist approach. It feels safer.
I used the Perfect Lip color for Saskia's blushing because it looks like the color that Nikki uses in her videos:
 |
| That's really pink, though. |
I mixed the paint with a cheap-o brush and then applied it with my smallest mop brush:

I'd get a tiny bit of paint on the very tip of the mop brush, dab the brush several times on a paper towel until I could see brush marks (and not just a big spot of paint) and then I'd dab the paint onto a small area of the doll, using very light up and down motions. I'll show you the process on the back of Saskia's head:
 |
| After dabbing paint onto the vinyl with a mop brush. |
Once the paint was on, I'd dry the brush even more on a paper towel and then continue to dab the brush over the paint to spread it out and make it less blotchy:
 |
| Spreading the paint out. |
Last, I'd use a larger, dry mop brush to spread the paint even more and help it to dry:
 |
| (At this point I was only using the cosmetic wedges to support Saskia's head) |
Here's the final effect:
 |
| And it gets even more subtle as it dries. |
I actually started this blushing process on the legs and arms--saving Saskia's face for last. Here's the right leg after I finished blushing:


And here's that same leg in the studio for some better pictures:


Here's a comparison between the blushed leg and the un-blushed leg:

I might go back and add more color later, but for now I'm happy with this difference:

Putting the first coat of paint on Saskia's head was nerve-wracking. I was so afraid that I would mess things up. Back in my Berenguer-painting days, I would use acetone to remove any mistakes in the acrylic paint. Acetone is nasty stuff, though, and it can melt the vinyl on some dolls. I decided to simply avoid making any mistakes. Solid plan, right?
I used a very light first coat because I was so nervous about messing up:
 |
| Suntanned Saskia. |
For the second coat, I got a little bolder, and Saskia got pretty red in the face:
 |
| Sunburned Saskia. |
She didn't look quite that red to me at the time. I think her pale mouth was making her face look a lot more colorful than it really was.
I started trying to paint the mouth, but this was really intimidating. The lips, tongue and gums should probably all be slightly different shades of pink...but I only have Crease Red and Perfect Lip. I started layering Perfect Lip on the lips and coating the tongue with the darker Crease Red. I tipped Saskia's head upside-down a lot to get the paint to pool in the tiny crevices of her mouth:

I even dumped big puddles of paint into the corners of her mouth to try and get those areas to be darker--like shadows:
 |
| Or like she just ate some prunes. |
After many layers of using these techniques, I started to see some dark lines at the edges of Saskia's tongue, and some faint pink outlining her lips:

Then, I tried to make the tongue darker, but the paint would not stick to certain areas and it was driving me crazy.
I finally resorted to grabbing some undiluted paint right out of the tub (never do that!!) and smearing it on Saskia's tongue. This was not a good idea:
 |
| Maybe I should try for a zombie reborn? |
I dabbed and rubbed at the tongue and tried desperately to remove most of the paint before it dried. This is what I ended up with (the lighting changed because this shot is in the studio):

Here's Saskia's full head:
 |
| Hm. |
I was not very happy with her mouth at this point. It looks like she's wearing lip liner:

Also, her tongue isn't right. Maybe it needs to be darker? Maybe those dark areas are too dark? I'm not really sure. I've looked at a lot of photographs of baby mouths and still can't figure out what I should do differently.
 |
| Saskia looks scared. Rightly so. |
In a fit of frustration, I dampened Saskia's mouth and tried to erase a lot of the paint before it was thoroughly dry. A lot of the paint would not come off. This is what she looks like now, poor thing:

Maybe the rubbed-off paint will create the texture and definition that I was missing? Or maybe it will just make the mouth even harder to complete.

When I'm doing an art project, I often have a hard time stepping away and getting some perspective. For these project blog posts, it can be hard for me to put the paintbrush down and take some time to write. With Saskia, though, it was clear at this stage that I needed a break. So, Part 1 of The Saskia Project will end somewhat abruptly. In situations like this, I usually find that things are not going as badly as it seems in the moment...and sometimes the solution is right in front of me and I just can't see it. I hope that ends up being the case here.
After a little break, I'll continue to fine-tune Saskia's paint...and if that endeavor goes well, I might even get out my rooting needles and try to add some hair. Stay tuned! In the meantime, feel more-than-free to offer advice. I probably need it.
Also, watch for the unveiling of my mystery reborn baby! I'm completely obsessed with that unopened box. We'll be able to see up-close how an experienced reborn artist gets the job done...and have a bunch of fun surprises, too. I can't wait!
 |
| Saskia's parts drying on a paper towel roll holder. |
Oh my goodness I love Saskia's headsculpt! When I first saw it, I didn't care for it but it grew on me. The unique headsculpt definitely helps the realism. She looks just like a real baby like that. A little confused, maybe sleepy. The open mouth reminds me of a baby yawning, but her eyes seen too open for that.
ReplyDeleteAnyways, I was so glad to see this post as I had just been hunting for a baby doll that looked real (I was looking for more play dolls or a used Lee Middleton doll on ebay to go with my 24 inch girl) when I decided to see if you had posted anything, and surprise! I will most likely never reborn my own doll but I love looking at pictures and I am so eager to see how Saskia will turn out. I'm sure she and Joey will look sweet posed together.
A while ago, I was watching a Judge Judy episode with my parents (even though I'm well into college I'm still with them X)) When a reborn artist and the recipient of an order came on. I was shocked to see that. The customer had paid 2,000 dollars for a reborn doll. Sadly, there were no pictures but I can't even fathom what a 2,000 dollar doll looks like.
Good luck with your reborning Emily! I can't wait to see what little Saskia will look like fully done. Also I have an intense need to find out what your surprise baby looks like too ;) I can never wait for a surprise, I'm far too impatient!
I'm far too impatient about surprises too, Caroline!! :) I'll try to get that post done by this Sunday so we don't have to wait long. The Saskia that I linked to on eBay cost almost $3,000, if I remember correctly. It's amazing. The babies can really go sky-high because people get emotionally attached, I guess. I love the Lee Middleton babies. I think that was the first kind of doll I bought as an adult--a little baby boy. I don't have him anymore. :( I think he was called "Peanuts."
DeleteI forgot to mention, my Lee Middleton toddler (24ish inches) is absolutely gorgeous and I love her, but she has violet colored eyes. Up until recently I had thought that her eyes had turned that color, but I was looking through past pictures and I found the picture of the Christmas I got her, only to see she had violet eyes then too! I looked up her model online and apparently the white doll just had purple eyes. I'm not the biggest fan of them though and have always wanted to switch them but I don't have your courage to do it!
ReplyDeleteI don't really like the purple eyes, either. I wonder how hard it is to swap Middleton eyes? I've never tried that. Every doll brand can be different, that's the trouble. But oh, man--those 24 inch Lee Middleton girls would look AMAZING with some glass eyes!
DeleteThank you for your response :) Maybe one day I'll buy some nice glass eyes (maybe blue or green to go with her beautiful blonde hair) and send her to some professional! I'm much too nervous to do it myself lol. She's had these purple eyes for over 9 years and I think she would look much better with a realistic eye color.
DeleteI only have my Lee Middleton and two adora babies in the high quality baby doll department. I believe when I was 9-11 my grandmother would buy me a pricey doll and some gorgeous clothes. Ah the nostalgia is amazing.
I'm so excited for this series! And the surprise baby reveal! Please, please, start a Patreon!
ReplyDeleteAlso, the white part of the eye is the sclera. The clear part is the cornea. I'm sure you knew this and just brainfarted.
Saskia is too plump and fold-y to be a neonate. Until you got to the head ridges, I'd have said she looked like my six-month-old.
Anyhow, I love love love the start you've made with her. I hope you're having fun with the process, and your contribution to the doll collector community with this project/review/experiment is invaluable.
Thank you.
Thank you so much for saving me from my brainfart. ;D
DeleteI thought Saskia looked more like a four-to-six month old, too. She's pretty small, though, which can warp my perception of the plumpness (I need to post some perspective pictures!). Also, I had two ten pound babies myself, so I might have a slightly imprecise idea of what a newborn looks like. :) The Patreon idea is so generous--thank you. I was intrigued to read that last week in the comments. My son actually just introduced me to Patreon recently because he wanted to support someone. I'll look into it! Thank you again.
Maybe you could try not to apply all the paint coats to the whole lip area to avoid that lipliner effect? Or mix some of the skin paint into the colour for the outer lips and some crease paint into the colour for the inner part of the lips. The colour was too uniform at the point when you removed it, it will look more realistic when you mix it up. Good luck with the project, looks good so far!
ReplyDeleteOooh--thank you for the excellent advice! That makes a lot of sense, and it seems to be what the really good artists are doing (just from looking at the finished babies). I will definitely try this! Now I'm excited to get started again!
DeleteI scrolled back to your paints. Burnt sienna is another good shade to mix into your reds. If you look closely at Joey, you'll see that his lips have a mild transition into the skin tone. You should be able to achieve that by patting the outline with cotton swabs or sponge eyeshadow brushes and decreasing the painted area with each coat.
DeleteI think you're doing a fantastic job!!! :D Saskia is looking super adorable! I know next to nothing about doll customization...I've only done a few reroots and eye color repaints, and those were on cheap play dolls. I TOTALLY know what you mean, though, about having a different perspective after walking away and coming back to a project. I have to do that all of the time for a bunch of my stuff! Earlier this summer, when I was trying to make doll Star Trek uniforms, I was firmly convinced that they looked like pajamas and that they were awful...after stepping away for a few days and coming back, I realized that the situation was not quite as bleak. ;)
ReplyDeleteI can't wait for Sunday Surprise!! :D
Wow! What a nice baby!
ReplyDeleteGreetings from Russia. I have been reading your blog for a couple of years.
I never thought I would want to make something like that too! But I do want!
What do you think about painting vinyl Ashton Drake galleries jointed Effner mold dolls? Maybe Alice or Little Shawl Dancer?
Wow! I would never have the patience to make a reborn doll! Even the thought of all the work that goes into them makes me want to have a tiny little panic attack!
ReplyDeleteOn the other hand I used to make a LOT of watercolour portraits and to do the darkened areas in the corners of her mouth I'd suggest using a thin layer of brown (burnt umber if you have it) then painting over those areas with whatever colour you do her gums with when you paint the gums. It will blend more naturally.
To avoid the lipliner effect use less paint or less diluted paint for her lips. If the paint pools, you'll automatically get a lipliner effect at the borders of the pools.
I'm so excited to see how this project goes! The painting you've done on the limbs looks great so far. It's really interesting to see all the in-progress photos.
ReplyDeleteI've always though reborns were adorable, but I've never made the jump to actually buying one. (Though the surprise baby idea is tempting, I can't wait to see yours).
good luck on your project! :) I like reborns myself (I have one, I'd be scared to death to make one though, ;) I can't wait to see how it turns out.
ReplyDeleteRegarding the body, I think the gathered part is meant to be the baby's butt, not the chest. Unless I'm misunderstanding what gather you're referring to.
ReplyDeleteI've never understood the appeal of reborns, but reading this was fascinating all the same. Can't wait for more.
You're correct, Kimmie. It is the bottom. ; )
DeleteYou're doing great. I've always found reborn dolls so realistic it was eerie (especially the ones with a breathing sound) but perhaps seeing one created from scratch will change my mind:-)
ReplyDeleteI still think the Patreon idea is good and fair.
Oh my word! I've heard of these dolls but don't know much about the so, after reading this post, I went and researched all about them! I also showed my mum some of them and we spent a while cooing over pictures of some fantastic babies! :) Yes take a breather and went you come back you'll have fresh eyes and you'll make Saskia beautiful, I know it :)
ReplyDelete-Lydia
Lydia's Dolls @ http://lydiasdolls.blogspot.co.nz
I don't do baby dolls at all, but I'm fascinated by the painting process and I've done a couple Our Generation 18inch repaints that I did not do properly at all and would like to attempt again in the future, and have some pullips I'd like to work with, so this is fascinating! Also, I really like the head blushing! Impressive!
ReplyDeleteI am not into re-borns but the creative process of them enthralls me and I think your skill is amazing, just flat out amazing. Saskia face up is like she is waking up and coming to life when you apply those paints to her face! I like doing faceups on the fashion dolls but have never really pursued it- this gives it a whole new level/ or meaning like that of the bjd world.. I look forward to your progress in this medium.
ReplyDeleteSaskia is looking great! Painting is always difficult because doing it well often involves the tiniest changes and processes. I usually give up because i can't see the improvement fast enough as well, haha.
ReplyDeleteSomething I thought I would mention for an upcoming Sunday Surprise (although I can't wait for your mystery baby already) are these odd new toys I just heard about called Hatchimals. From what I've heard they're some sort of robotic toy that comes sealed in an egg. You have to care for them somehow in their egg stage and then they really hatch from it, irreversibly like a true egg. And of course your animal is a mystery, and I guess they can be raised further from 'infant' to 'child'. It sounds bizarre and I really want to see someone review it.
This is a really interesting project! And Saskia is so lovely.
ReplyDeleteI can't wait to meet the surprise baby.
Terrific project, Emily! Can't wait to see part two.
ReplyDeleteI am always amazed at the doll projects you take on. I have no artistic ability (but I am crafty!) so this is something I could never do.Thanks for sharing this project. I am so thrilled to see each step as you complete it! Can't wait to see her all done! I am very interested in see your rerooting process too.
ReplyDeletePerhaps the mouth dosen't look right because it isn't shiny. I've painted some toy's eyes and mouths with clear nail polish. But you could try gloss vanish for making the tounge and lips look wet. Even making the nails shine.
ReplyDeleteFor what it's worth, I think that the skin tone/texture and blushing on Saskia's limbs are INCREDIBLE. I can't believe how realistic you managed to make them look! The blushing on her scalp is amazing, too.
ReplyDeleteI don't really have any practical advice to offer. I just wanted to pop in and tell you that I enjoyed reading this entry, and I *know* that Saskia is going to be beautiful by the time you're finished with her.
I don't collect that kind of dolls, but I'm reading your project like I would read an adventure novel : it's informative, and entertaining, and fascinating. Your doll is promising.I'm looking forward for the next chapter !
ReplyDeleteI haven't read all of the comments, but I wanted to tell you to be sure to take the eyes OUT before she goes in the oven. I've never seen the Saskia kit done as a newborn. I can't wait to see your Baby!
ReplyDeleteJust found your blog today and started following. Love it! - jo
projekt dziecko - niesamowita to idea!
ReplyDelete